Offer voluntary overtime or time off
Intraday dynamic scheduling allows you to fine-tune staffing to meet current conditions by offering selected agents the opportunity to take voluntary time off, overtime, or both when the generated schedule overstaffs or understaffs the service queue.
The schedule changes can be for the current day or a future day. These agent-initiated schedule changes can be configured to require approval or go into effect immediately without any approval needed.
From the Intraday Dynamic Scheduling page, you can do the following:
- Browse a service queue’s schedule coverage
- Create a new intraday dynamic scheduling event
- View and edit a list of existing intraday dynamic scheduling events
NOTE It is strongly recommended that you use work condition profiles to optimize an agent’s intraday lunches and breaks.
Browsing
The Intraday Dynamic Scheduling page opens in the Event view, which lists all existing events. Click Browse and then select a service queue from the drop-down list to display that service queue’s schedule and coverage for the current date. You can choose a different date if desired.
Once you have displayed the schedule and coverage for a service queue, you can:
- Select another service queue from the Service Queue drop-down list.
- Select a different date on the calendar bar. You can select today’s date or any date in the future.
-
Select a different forecast from the Forecast drop-down list. You can also select Reforecast to reforecast the schedule. Changing the forecast used can help you determine the staffing levels you need on the selected day.
NOTE Reforecast can be used only for the current date.
Viewing existing events
Click the Event button (upper right corner of the Intraday Dynamic Scheduling page) to view a list of existing events for the current and future dates. You can click the Settings button next to any of the listed events to view the Intraday Dynamic Scheduling Events page for that event. If the event is ongoing, a countdown clock is displayed at the top of the page that shows how much more time is left for agents to sign up for the event.
The fields in the list are described in the following table.
| Field | Description |
|---|---|
| Settings | Click this button to view, edit, or delete the intraday dynamic scheduling event. |
| Type | The type of change to the schedule: VTO (voluntary time off), OT (overtime), or both. |
| Event Name | The name of the intraday dynamic scheduling event. Click the event name to view the Intraday Dynamic Scheduling page for the event. |
| Service Queue | The service queue that the listed event applies to. |
| Schedule Date | The date of the amended schedule. |
| Status |
These three numbers are, from left to right:
|
Creating a new intraday dynamic scheduling event
Click the Create Event button (upper right corner of the Intraday Dynamic Scheduling page) to create a new event.
The sections on the Intraday Dynamic Scheduling Events page are described below.
The unique names of the event.
This section is used to configure when agents must respond to the event with their revised schedules, deadline, and if their response has to be approved manually.
| Field | Description |
|---|---|
| Deadline Date | Enter the date when the responses from agents invited to change their schedules are due. |
| Deadline Time | Enter the time on the date when the responses from agents invited to change their schedules are due. |
| Approve agent schedule changes automatically | Select this check box if you want agents’ schedule changes to go into effect automatically. If cleared, all agent schedule changes must be approved manually. |
| Allow min/max hours per day/week violations | Select this check box if you want agent schedule changes to violate the min/max hours restrictions assigned to the agent. |
Select the service queue whose schedule you want to change.
NOTE These fields are the only fields that can be updated after an event has been created.
| Field | Description |
|---|---|
| Schedule Date | Select the date of the schedule change period. |
| Change Start Time |
Enter the start time of the schedule change period in 24-hour format. NOTE To select midnight, enter 0:00 manually. |
| Change End Time |
Enter the end time of the schedule change period in 24-hour format. NOTE To select midnight, enter 24:00 manually. |
Select the forecast used to indicate staffing needs for the date of the schedule change. You can choose the production forecast, a named forecast, or an intraday reforecast.
Choose the kind of schedule change you want to offer selected agents:
- Voluntary time off—agents give up time during the overstaffed intervals
- Overtime—Agents pick up additional time during the understaffed intervals
- Both—Agents give up time during overstaffed intervals and pick up additional time during understaffed intervals
These fields appear when you choose the Voluntary time off or Both schedule change option.
| Field | Description |
|---|---|
| Minimum Time Off | Enter the minimum amount of time off an agent can take. |
| Maximum Time Off | Enter the maximum amount of time off an agent can take. |
| Allow multiple time off selections | Select this check box to allow agents to take time off in multiple segments within the schedule change period—that is, the time off does not have to be contiguous. |
| Staffing Goal Threshold | Enter the amount of overstaffing (positive number) or understaffing (negative number) allowed during each interval in the schedule change period. |
| Exception To Be Used | Select the exception to be used for the voluntary time off in the agent’s schedule. |
These fields appear when you choose the Overtime time off or Both schedule change option.
| Field | Description |
|---|---|
| Minimum Overtime | Enter the minimum amount of overtime an agent can take. This field appears when the Overtime or Both schedule change option is selected. |
| Maximum Overtime | Enter the maximum amount of overtime an agent can take. This field appears when the Overtime or Both schedule change option is selected. |
| Allow multiple overtime selections | Select this check box to allow agents to take overtime in multiple segments within the schedule change period—that is, the overtime does not have to be contiguous. This check box appears only when the Overtime or Both schedule change option is selected. |
| Force a minimum gap between the shift and the start of overtime | Select this check box if you want to require there to be a minimum amount of time between the agent’s regular shift and the start of overtime. |
| Minimum Gap Duration | Enter the minimum amount of time that can occur between the agent’s regular shift and the start of overtime. |
| Staffing Goal Threshold | Enter the amount of overstaffing (positive number) or understaffing (negative number) allowed during each interval in the schedule change period. |
Select the agents you want to invite to participate in the intraday dynamic scheduling event. The agents listed in the Available pane are those who are supporting the service you selected.
NOTE For voluntary overtime events only (not including events for both voluntary overtime and voluntary time off), you have the option to select agents outside of the selected service queue to participate in the event. This gives you more flexibility to meet your coverage requirements. To make those agents visible in the Available pane, select the “I want to assign agents in other service queues to the event” check box. Note that if you select the check box, assign outside agents to the event, and then clear the check box, those outside agents are removed from both the Available and Assigned panes.
An invited agent might not be able to take part in the event because the agent’s schedule does not work with the event’s requirements. In that case, the agent sees a message that selecting time off or overtime is no longer available for the event.
NOTE Agents can sign up for voluntary overtime on days they do not have a schedule.
Approving schedule changes
If an Intraday Dynamic Scheduling event is configured to automatically approve agent schedule changes (the “Approve agent schedule changes automatically” check box is selected), then the schedule change appears immediately in the agent’s schedule.
Agent schedule changes that need approval appear on the Intraday Dynamic Scheduling page for that event.
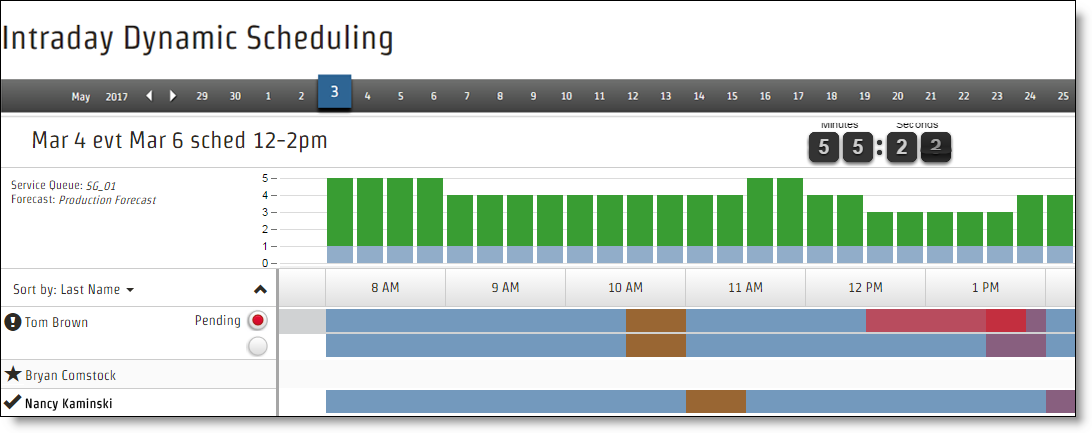
The names of the agents who have been invited to take part in an intraday dynamic scheduling event are marked with one of three icons (shown in the above graphic).
- A star—Denotes an agent who has been invited to participate in the event but who has not yet replied
- A check mark—Denotes an agent who has made schedule changes and those changes have been approved, either automatically or manually
- An exclamation point—Denotes an agent whose changes are waiting for manual approval
If an agent’s changes are waiting for your approval, there are two schedule bars next to the agent’s name. The upper bar is the proposed schedule (pending) and the lower bar is the agent’s existing schedule. When you toggle between the agent’s current schedule and the agent’s pending changed schedule, the coverage updates to help you decide if you want to accept the pending change or not.
Accept an agent’s proposed schedule
- Select the Pending option.
- On the toolbar, click Save .
In the following situation, Calabrio ONE will replace an unpaid activity in the schedule of the agent who submitted the changes with a Not Available activity.
| Intraday Dynamic Event Configuration | Agent Actions |
|---|---|
|
Includes voluntary time off that uses a paid exception. |
|
Deny an agent’s proposed schedule
- Select the Current option.
- On the toolbar, click Save.